Saturday, August 31, 2013

Mixed Media on Canvas tutorial

Hello, I hope you will take part in the LNS (late night stampers) Fall Treasure Hunt. See the details in yesterdays post. My clue is RE-INKERS. It will be made clear to you why I picked that item as my clue when you view today's tutorial on how I do my mixed media. If you have been following me on Pinterest, you know that I have an entire board dedicated to this. There are some good video tutorials on that board also. I'm sure there are others ways to do mixed media, but I will be sharing what works for me.
This is the project I will be showing you. I feel in love with the card designs by Bright and Merry and have adapted them onto canvas. I have used Stampin' Up! materials where appropriate. So let's get started.
I purchased all my canvases from Michael's simply because it is the closest craft store near my house AND because they were having a BUY ONE GET ONE sale last week. I used an 8x10 canvas for this snowman.
  1. Begin by preparing your canvas and background. I covered my canvas with a coat of Modge Podge Matt. I used several different designs from the Winter Frost Designer Stack (132183 found in the Holiday Mini). I tore each page into uneven pieces and used front and back designs if they fit into my color scheme. I put modge podge onto the canvas with a sponge brush and again on the back side of each piece of paper and glued it to the canvas covering the top of the paper as I went. I used my heat tool to quick dry the modge podge. Keep the tool moving as you do this to avoid large air bubbles from forming. If they do, stop and smooth them out. Note: I don't always use different papers on my background. Most times I just use one design and cut it about 1/4 inch smaller than my canvas.


  2. Now it is time to start layering on the paint. Here is where the re-inkers come into play. I start with a dime size blob of white paint I purchased from Michael's, you know, those cheap bottles that are about 80 cents. I used an empty SU embellishment plastic container. They are perfect for mixing the paint in. I added 4 or 5 drops of Tempting Turquoise re-inker into the white paint and mixed it with my sponge brush. I brushed the paint over the paper and sides of the canvas. You can decide how opaque you wish to go.I covered my fairly well. Then I mixed together some white paint and Old Olive re-inker and painted the lower portion of my background, also adding some of the green to the sides onto top of the blue. In the photo below you can see what I did. I also mixed together some white with real red, not much white or it will be pink, and added some splashes of red on the edges.


     3. Now comes the fun part, added all kinds of designs to the background using your stamps or any material that will add texture. I used  paint directly onto the stamps. Heat set paint to dry, then add a coat of Modge Podge. The colors of the blue and green will intensify as you add coats of Modge Podge. I did have some problems with the white paint fading as I dried it with the heat tool, but I just kept moving forward.
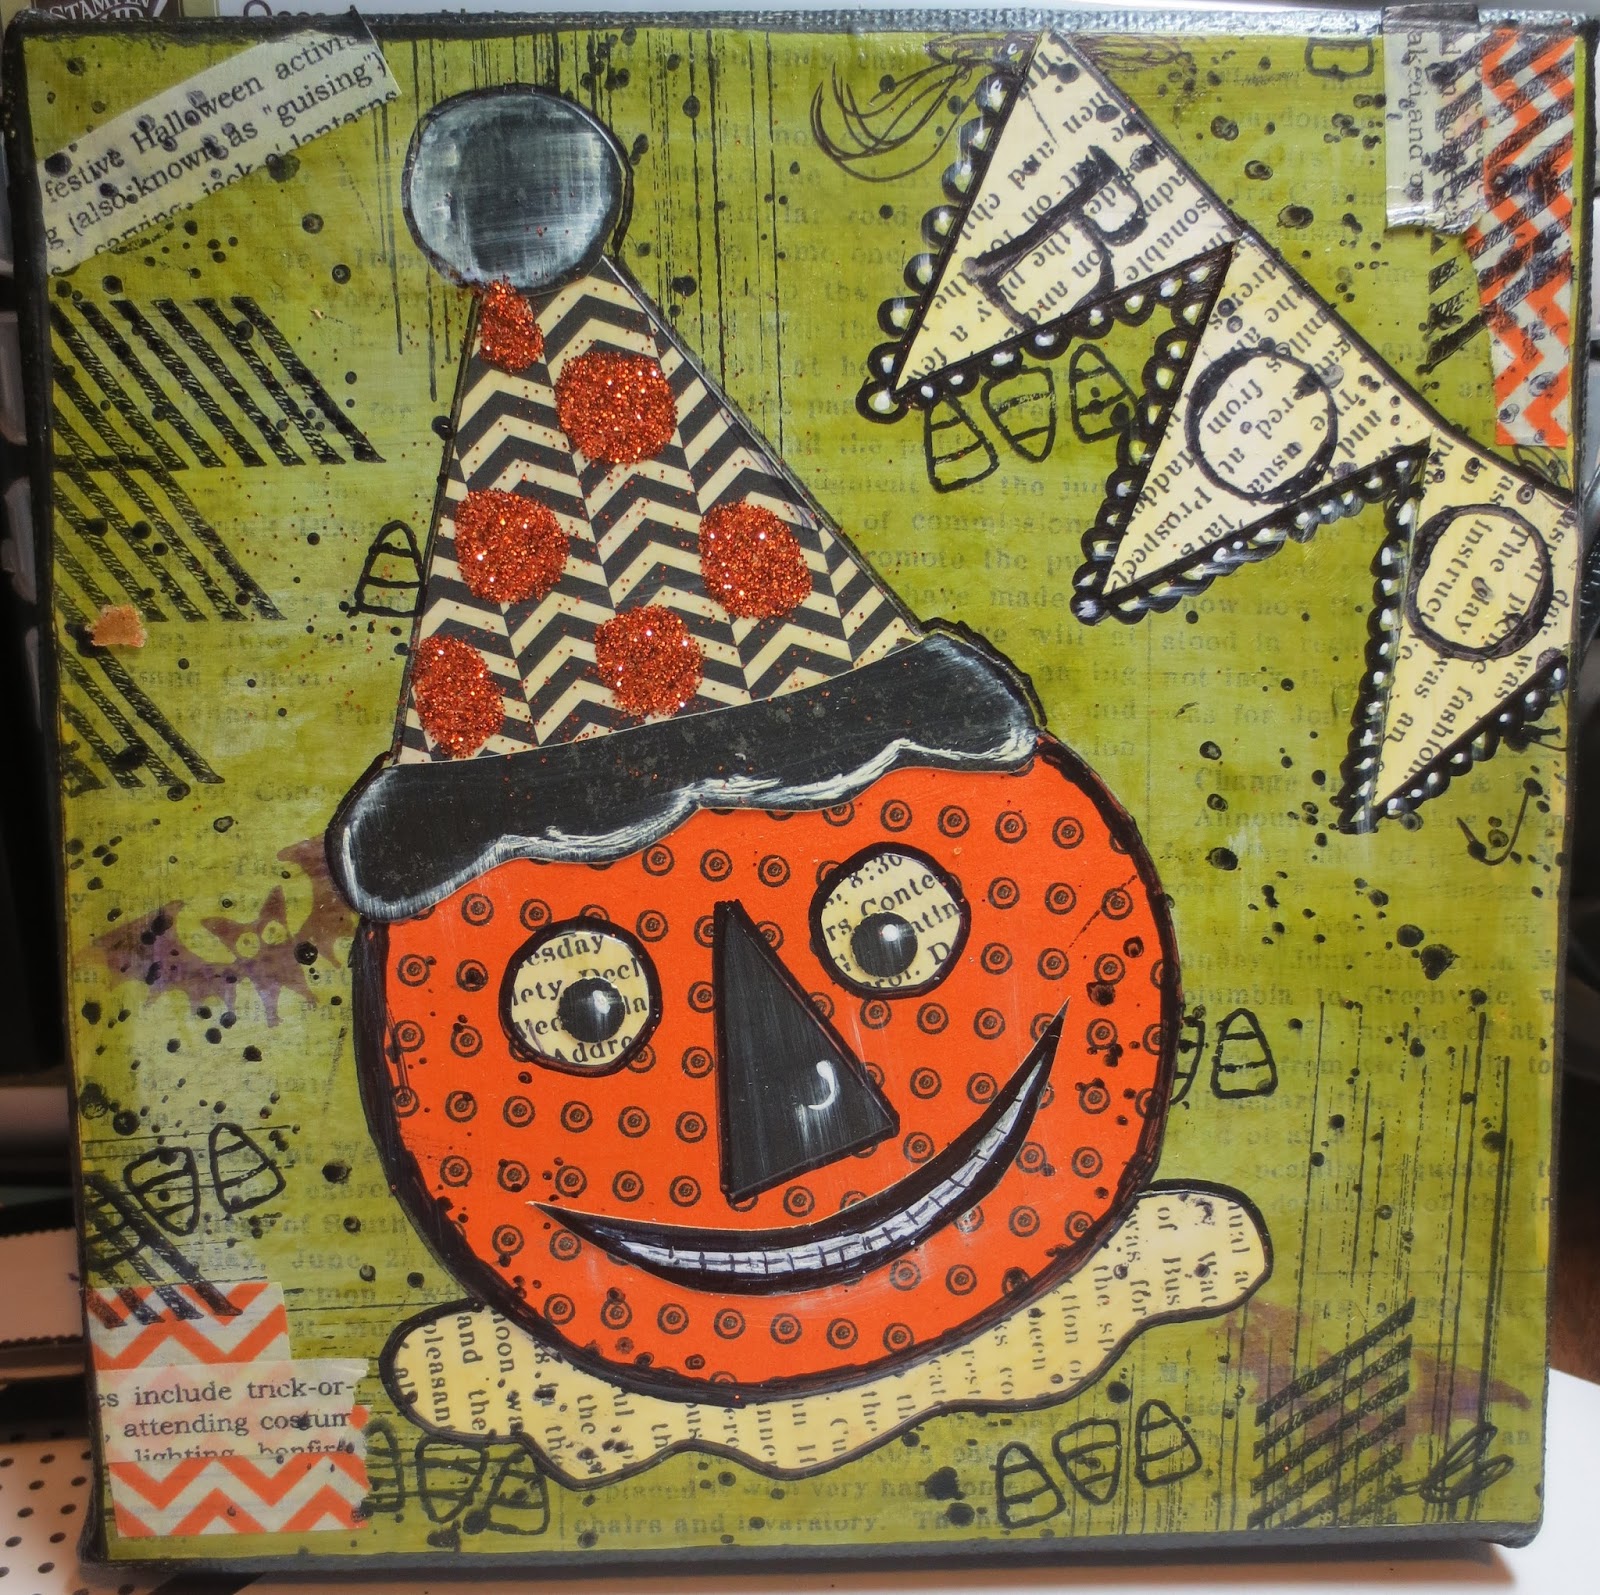
    4. At this point I could also start adding texture using by black stazon ink or other permanent black ink. On this project I added it later, as you will see. Next I started building my design with pieces of designer paper. I started with the tree and added some washi tape as well. I used the Modge Podge on the background and backs of the papers, then put a coat over the paper. Heat set to dry.
    
     5. The snowman was next. I started at the bottom and worked my way up. Every part of him started as a piece of paper glued down with Modge Podge. Then paint was added. I sketched the snowman onto a piece of copy paper to get the right shapes and proportions. Then laid my sketch over the desired print paper and traced around the pieces with my stylus. This left enough of an impression for me to follow to cut out each piece.
    The hat is actually cut as one piece, but could easily be done in stages. I used black and white paint to add shadows to give the hat dimension. The carrot nose is cut from Tangerine Tango by hand. The red bird was punched from Cherry Cobbler cardstock using the wing section of the SU bird builder punch. You can see I had added old olive polka dots to the background using the new stencils from the Build a Banner kit found in the Holiday mini.I hand painted the holly leaves and berries. Everything is heat set to make sure all the modge podge and paint is dry.


     6. The final step is to add all the black details using stamps and black permanent markers.
    Some of the stamps you could use to add details are: Happy Day, Gorgeous Grunge, Positively Chevron, Background Builders, Clockworks, Festive Flurry. There were also some great stamps I found in my Paper Pumpkin  boxes! I used two kinds of markers.  I used Prismacolor Premier in Jet Black to outline all the pieces.Then I used an ultra fine black Sharpie for the skinny details.


    I wrote my title onto the white sheets of tag that back out designer paper packs, cut them out, glued them down with Modge Podge, and heat set. When they were dry I outlined them and then added the scratch marks around them. I gave the entire canvas one more overall coat of Modge Podge and heat set to dry, be sure to add modge podge to the edges of the canvas as well.
    As a last step I used the tip of my stylus and dipped it into white and red paint to make the lights and snowflakes on the tree.  I hope this tutorial was helpful. You can leave comments and questions if you have them. I will be posting many more canvas projects that I have finished as the days go by. I hope you will check back.


Late Night Stamper's Fall 2013 Treasure Hunt and Blog Hop


How to play:
-visit each of the blogs listed (it’s always nice to leave a comment!) -look for participating Treasure Hunt players – they will have the picture of the SU! box (above) and they will list their clue
-make a note of what the clue is, and whose blog it is on
-once you’ve collected 50 clues, email them to ME at leuenber@swbell.net listing each clue & where you found it
-you have from Tuesday August 20th to Friday, October 25th 2013 to collect 50 clues and email them to me, to be entered into the contest -Contest closes Friday Oct. 25th at midnight PST

 LIST OF PARTICIPATING DEMOS & BLOGS

First NameLast NameBlog AddressCountry
TammyBaldwinwww.creativeapplescrampers.blogspot.comUS
CarolynBennettwww.carolynstamps.comUS
JodyBrechbillwww.jodybrechbillstampinqueen.comUS
BrendaCookhttp://www.cardscraps.comUS
CaroleeCrabbCare2stampwithcarolee.blogspot.comUS
TinaDavishttp://www.tinadavisstamps.blogspot.com/US
BeverlyFarmerwww.createwithbev.blogspot.comUS
SherrillGraffhttp://yourhiredscrapbooksupplies.blogspot.com/US
PennyHanuszakhttp://pennytokensstampinspot.blogspot.comCanada
LoriHelvickcreatewithlori2.blogspot.com/US
DianeIsonhttp://teachtostamp.blogspot.ca/Canada
SuzanneJohnsonwww.gottastampwithsuzanne.comUS
NancyLegatewww.stampnnuggets.comUS
CarolynLindenmayerhttp://carolynscardcreations.blogspot.com.au/Australia
RhondaMacnallyhttp://rhondalovesstamping.wordpress.comCanada
SerenaMarshwww.reenybeanies.blogspot.caCanada
RobinMessenheimerhttp://robinscraftroom.comUS
JoniMetraswww.joniinthespotlightstamping.comUS
CynthiaMillanhttp://www.StampWithCynthia.blogspot.comCanada
KimberleyMorrishttp://procrastistamper.blogspot.comUS
RuthPearsonhttp://pearsonifiedcrafting.blogspot.co.uk/UK
GingerRabesahttp://www.stampingginger.comUS
BrendaRiehlewww.stampandscrapwithbrenda.blogspot.comUS
LindaRodenbergwww.prettyinky.blogspot.comUS
HeatherSewczakheatherscutecards.com/blogUS
CynthiaSimpsonhttp://cynthiastampinhappening.wordpress.com/US
DeeSlaterhttp://createwithdee.typepad.comUS
DeborahSmartwww.stampandcreate.netCanada
B JayneStenstromhttp://www.jaynestamps.com/US
TanyaStottlemirewww.scramptastic.blogspot.comUS
CharleneTackvicwww.AlwaysStamping.comUS
JackieWatsonjackielwatson.blogspot.comUS
Lesley         Lendon                 http://lellyjellys.blogspot.com/                                             UK
Amanda       Frankel                www.OurCraftyPlaydate.com                                             US
Vanessa       Terrell                 www.stampwithvanessa.com                                              US
Kris               Sobolik               www.maddiebugdesigns.blogspot.com                               US
Misty             Snell                   http://snellmisty.wordpress.com                                          US
Rhonda         Price                   www.stampbyrhonda.blogspot.com                                    US
Jaime            Barnett                http://kankiepopscards.blogspot.co.uk                               UK
Janet             Yates                  www.stampinnerd.blogspot.com                                        Canada
Avery             Murphy              http://alongcamestamping.blogspot.ca                               Canada
Jennifer         King                   http://stampingcontact.com                                                 US
Erika              Trowell              www.idigstamps.com                                                           US
Mary K.          Wessling           http://maryscraftroom.blogspot.com                                    US
Jean              Piersanti            www.Beautyandthestamper.blogspot.com                          US
Karina           Chin                   www.karinaskreation.com                                                   Canada 
Samantha      Joyce                www.crafty-sammy.blogspot.co.uk                                      UK
Jennifer         Wren                www.txjennywren.blogspot.com                                           US
Susan           Timchack           http://susan-stampinsue.blogspot.com                                US
Cindy        Mitchell-Clark         www.cindysstampingcorner.wordpress.com                       US
Cindy             Fodor                www.stampthelove.blogspot.com                                        US
Amber        Meulenbelt           www.stampwithamber.com                                                 Canada
Anastasia      Radloff               www.stampinblondie.blogspot.com                                     US
Robin            Boyer                  www.robinscreativecorner.com                                           US
Amy              Hoffman              www.stampandscrapwithamy.blogspot.com                       US
Louise          Radies                 www.creationsbylouise.blogspot.com                                 Canada
Holly            Stene                   http://hollyshobbs.blogspot.com                                           US
Melissa       Banbury                www.porchswingcreations.com                                           Canada
Laura         Leuenberger          www.stamplaura.blogspot.com                          US


My clue is re-inkers


Friday, August 30, 2013

Mixed Media BOO

When I attended the Stampin' Up! convention last July, Shannon did a great demonstration on mixed media. This is something that really caught my eye and I knew I would have to try it! I started by casing two of the Halloween themed canvases she did. I used all Stampin' Up! materials, except for the canvas, modge podge, and black markers. I will be posting more so be sure to come back. Also I will be participating in a LNS Fall Treasure Hunt in October. Look for details.


I will be posting a tutorial on how I do my mixed media soon.